2CV Chassis Replacement

gibgib

Local Tyrant
Staff member
Administrator
VIP Paid Subscriber
Fellow Frogger
Joined
Mar 3, 2000
Messages
3,836
Location
Sunshine Coast, Queensland
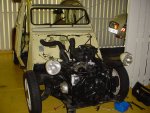
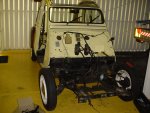
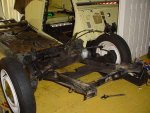
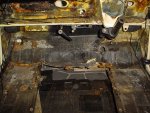
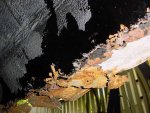
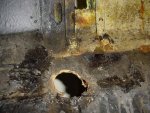
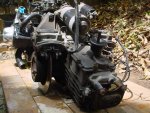
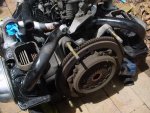
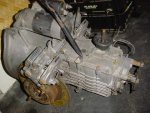
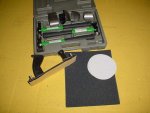
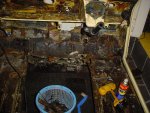
I've started dismantling the 2CV in light of the chassis rotting internally.

Handling was suffering:
  • Steering clamp catching on the firewall & generally steering heavier than normal.
  • "A" Panel guards squeaking going over speed bumps due to the chassis flexing.
  • No suspension travel on the front due to the portion of chassis in front of the firewall bending unwards, in turn bringing the bump stop limit downwards.
  • Plus other funny sensations while cornering over a bump & breaking.
Visual inspection before pulling apart shows little evidence of rust but clearly the integrity of the chassis rails had been compromised!
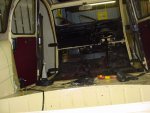
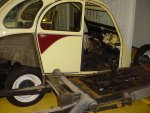
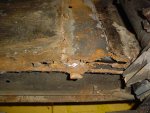
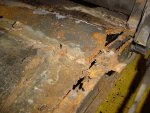
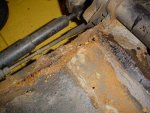
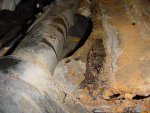
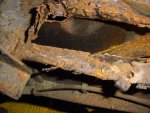
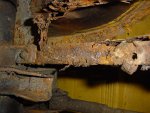
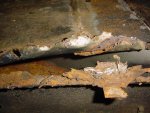
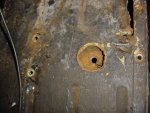
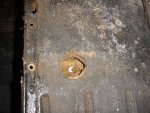
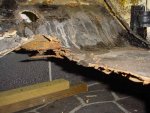
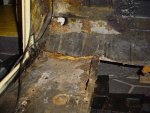
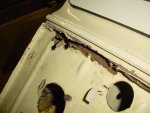
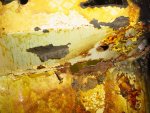
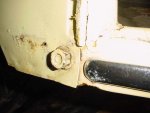
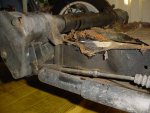
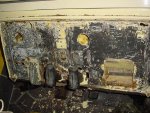
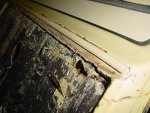
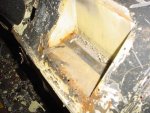
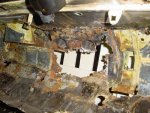
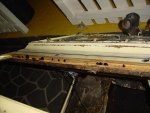
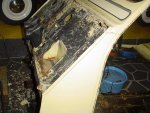
There is a ripple, a hollow & a fold, & even towards the end, a tear. It was the same on both sides. The floor also came away due to rust along a weld seam, which was probably taking the strain for a while hiding these symptoms.

The plan is to move onto a galvanised chassis, have the floor & all other rust outbreaks repaired, & respray some panels (or perhaps nearly all) myself, with some help & guidance.

I started work on it yesterday arvo.
The body will be off tomorrow. It appears the last welding dude welded some of the body to the chassis!
 

Attachments

  • chassis2.jpg
    chassis2.jpg
    89.1 KB · Views: 1,514
  • chassis1.jpg
    chassis1.jpg
    77.9 KB · Views: 984
  • chassis3.jpg
    chassis3.jpg
    70.1 KB · Views: 788
  • chassis4.jpg
    chassis4.jpg
    84.8 KB · Views: 1,013
Body came off today without too much drama. Only hurdle was being on my own, so I had to implement ropes to roof & my ute to take to weight.

As you can see the chassis is buggered.

Only 3 months ago this 2CV passed safety certificate & my inspection when I purchased it. The main bulk of the rust was hidden below a double skin body panel on the floor. I knew there was a little bit of rust but no way this bad.

I have been reading that 80's model 2CV's have been blessed with very poor metal quality in the chassis area.
At least with the new galvanised chassis & the body floor welding I will know I have a really good car.
If I were looking to buy an 80's model 2CV now, I would factor in the cost of a new chassis with the purchase, or buy one with a new one fitted to be sure of many years trouble free running.

The first pics are of the rust areas as they were. The others are the areas cleaned up & peeled back to reveal the internal skin & bottom of chassis.
 

Attachments

  • chassis5.jpg
    chassis5.jpg
    48.1 KB · Views: 837
  • chassis6.jpg
    chassis6.jpg
    51 KB · Views: 1,691
  • chassis7.jpg
    chassis7.jpg
    59.3 KB · Views: 888
  • chassis8.jpg
    chassis8.jpg
    63.6 KB · Views: 1,215
  • chassis9.jpg
    chassis9.jpg
    61.9 KB · Views: 829
  • chassis10.jpg
    chassis10.jpg
    57.4 KB · Views: 811
Continuation of images from above post....
 

Attachments

  • chassis12.jpg
    chassis12.jpg
    55.1 KB · Views: 604
  • chassis13.jpg
    chassis13.jpg
    56.9 KB · Views: 575
  • chassis11.jpg
    chassis11.jpg
    58.8 KB · Views: 608
Gee's Gerry,

your trying to scare me right :eek: :eek: :eek: I think my parents is an '84 model so was built in a different country with better metal. Well David Gries and Adrian Chapman thougt it was a lot better than I did.

seeya,
Shane L.
 
gibgib said:
Body came off today without too much drama. Only hurdle was being on my own, so I had to implement ropes to roof & my ute to take to weight.

Cor... should have given me a buzz, I'd have loved to help undress Dolly :blush:

Seriously, if you need a hand give me a hoy :wink2:

Cheers
Chris
 
DoubleChevron said:
Gee's Gerry,

your trying to scare me right :eek: :eek: :eek: I think my parents is an '84 model so was built in a different country with better metal. Well David Gries and Adrian Chapman thougt it was a lot better than I did.

seeya,
Shane L.

Chris & I checked over the whole car the night I brought it home & didn't find any rust apart from some surface rust here & there!
I gave it a knuckle test right around the underside before purchase as well.

GreenBlood said:
Cor... should have given me a buzz, I'd have loved to help undress Dolly :blush:

Seriously, if you need a hand give me a hoy :wink2:

Cheers
Chris

Not to worry it wasn't difficult at all. I may need help to turn it 90 deg sometime as I need to go back over the yellow brick road to turn it - due lack of space to swing the thing.
However, can't do that until the ute is gone - 4th of Feb.
 
Separated the gearbox from the engine this arvo so I could inspect the clutch & determine whether it's worth replacing the rear main oil seal or not.

The inside of the bell housing has a 1mm thick build up of grease although I can't see if there are any leaks. No oil leaks were getting to the ground while it was running anyway.

The gearbox is in need of a degrease as is the rear of the engine.
I will take the opportunity to paint what I can of the engine as well.

The body is almost completely stripped of "bolted on stuff" & I am still plucking up the courage to remove the windscreen without cutting the rubber (rubber's in good nic). There's an outbreak of rust in the lower left corner of the windscreen surround so it really needs to come out.

Body rust is localised to the front only. There is surface rust at one rear tail lamp assembly which I noted last week & treated, awaiting further attention.

From the front rubber grommet bolt access holes, pretty well up to the windscreen there are rust problems to fix. Floor pan in the middle is buggered as can be seen from the pics.
Theres a problem on the right side where the bonnet meets the firewall that I wasn't aware of & is quite bad.
Right along the bonnet hinge but mostly on each end is in a big need of welding.

Firewall on the left side has a hole which I knew about just after purchase & bogged up for rego.

The whole rust issue seems to have been caused by a rust hole behind the bonnet hinge, which leaked water into the interior. It ran down behind the oddments tray onto the floor bypassing the rubber floor mat. It then ate through the body floor & made it's way into the chassis.

The rubber mats do not allow the metal to dry once the water enters.

There is no way the rubber mats are going back into this car. I will go for some nice car carpets & perhaps, a couple of non attached small rubber mats to reduce wear on the carpets.
 

Attachments

  • chassis14.jpg
    chassis14.jpg
    61.9 KB · Views: 612
  • chassis15.jpg
    chassis15.jpg
    45.2 KB · Views: 562
  • chassis16.jpg
    chassis16.jpg
    59.2 KB · Views: 560
  • chassis17.jpg
    chassis17.jpg
    58.1 KB · Views: 613
  • chassis18.jpg
    chassis18.jpg
    56.2 KB · Views: 611
  • chassis19.jpg
    chassis19.jpg
    50.7 KB · Views: 548
More pics from 22/01
 

Attachments

  • chassis22.jpg
    chassis22.jpg
    34.1 KB · Views: 551
  • chassis20.jpg
    chassis20.jpg
    59.5 KB · Views: 538
  • chassis21.jpg
    chassis21.jpg
    68.1 KB · Views: 520
  • chassis23.jpg
    chassis23.jpg
    59.4 KB · Views: 506
Hi Gerry,

I pushed the windscreen out of our 2cv. Use a peice of rope about 1cm in diametre. From the inside peel the rubber back and push the rope behind it. Once you have gone right around the windscreen you should find it'll easily push right out. It's flat glass so it's all quite easy. This also works with the back doors and rear quater panels easily.

The rust in the bonnet hinge of my parents 2cv was only surface rust. Nothing like what your looking at. Really it's bloody hard to weld. Replacing the section is the sensible option.

seeya,
Shane L.
 
Hi Gerry, looking forward to what stuff you will be using to stop future rust, what paint etc.
So far i think Wurth rust converter or inhibitor seems best.
Hope everthing turns out best for this big job.
Cheers
 
DoubleChevron said:
Hi Gerry,

I pushed the windscreen out of our 2cv. Use a peice of rope about 1cm in diametre. From the inside peel the rubber back and push the rope behind it. Once you have gone right around the windscreen you should find it'll easily push right out. It's flat glass so it's all quite easy. This also works with the back doors and rear quater panels easily.

The rust in the bonnet hinge of my parents 2cv was only surface rust. Nothing like what your looking at. Really it's bloody hard to weld. Replacing the section is the sensible option.

seeya,
Shane L.

Thanks Shane, good idea!
I'll do all the glass tomorrow with that technique.

I can buy complete bonnet hinge & backing panel from http://www.2cvaustralia.com (parts links) as with whatever floor panels I need too.

JoBo said:
Hi Gerry, looking forward to what stuff you will be using to stop future rust, what paint etc.
So far i think Wurth rust converter or inhibitor seems best.
Hope everthing turns out best for this big job.
Cheers

I'm open to suggestions here as it's an area I've not tried myself as yet.
I am just used to fish oil as prevention.
When I fully restored the GS I took the body & panels to an auto body place for 2 Pac paint job.
The nuts & bolts of this job is a lot less than the GS was.
I intend to be frolicking around Sunny QLD again in the duck by early April :D
 
Bought some stuff from Super Cheap Auto in readiness for some bangin' & sandin'. There are pics below are of the dolly kit (currently on special for $9.99).

I was intending on having more done today however degreasing the engine & gearbox must have taken me 4 hours, & I'm still not 100% happy with it.
How do I get rid of that "black" look & take it back to alloy?

I tried some Silvo on the gearbox tonight which seemed to work but it's impractical to apply it to the whole thing. Perhaps an acid to etch it clean?

Underneath the house is chockas with panels & 2CV bits as you can see.
I've removed the badging from the boot lid & being fairly flat I thought it might be a good panel to start my panel beating at home career.

So basically today was buying stuff, visiting Chris at his work for advice :D, degreasing & general tidy up of work area.

I jumped across the chassis while cleaning up & it started to collapse under my weight :eek: (p.s. I'm not heavy). There is a pic of the way it is now.
I'd prefer to keep it straight to make easier dismantling when I obtain a new chassis so I'll stay off the thing from now on.

There's another pic of the guard stay nut which is locked on. The stud is turning in the sill. It has been advised to me to replace this sill (on the left side) while the welder is here.
 

Attachments

  • chassis24.jpg
    chassis24.jpg
    28.5 KB · Views: 544
  • chassis25.jpg
    chassis25.jpg
    66.5 KB · Views: 541
  • chassis26.jpg
    chassis26.jpg
    54.5 KB · Views: 536
  • chassis27.jpg
    chassis27.jpg
    58.9 KB · Views: 569
  • chassis28.jpg
    chassis28.jpg
    52.3 KB · Views: 578
  • chassis29.jpg
    chassis29.jpg
    26 KB · Views: 534
More pics from 23/01/06
 

Attachments

  • chassis32.jpg
    chassis32.jpg
    30.5 KB · Views: 490
  • chassis31.jpg
    chassis31.jpg
    39.3 KB · Views: 518
  • chassis30.jpg
    chassis30.jpg
    33.7 KB · Views: 491
  • chassis33.jpg
    chassis33.jpg
    33.9 KB · Views: 560
  • chassis34.jpg
    chassis34.jpg
    34 KB · Views: 546
  • chassis35.jpg
    chassis35.jpg
    52.1 KB · Views: 533
Hi Chris,

if you have a look at the painting thread in the technical section, Neils (username CGAT something-er-other) has mentioned to me before how to clean alloy.

Basically to get it nice 'n' shiny you need to sand it flat with wet 'n' dry paper, then polish it with alloy/metal polish. I wire brushed a lot of the alloy on mine, this dramatically improved it from it's 'corroded' look.

bootlid could be a good starting point. Maybe SWMBO is a bit of an artist and can paint something artistic on it for you :)

seeya,
Shane L.
 
gibgib said:
I tried some Silvo on the gearbox tonight which seemed to work but it's impractical to apply it to the whole thing. Perhaps an acid to etch it clean?

I'm just wondering with the panels on a 2CV being very thin, whether a soft faced hammer may be best to use, otherwise the hammers in the dolly kit may be a bit too "rough" and stretch the metal making it boingy on the flat panels. Otherwise don't hit it too hard.

As for cleaning alloy casings without dismantling, I found a brass brush, followed by a nylon scourer cleaned up fairly mild alloy corrosion without making it look too polished and then becoming a chore to keep clean. Once that was done I coated it in clear Tectyl metal protectant to prevent further corrosion. After 5000 miles in various weathers it seems to have survived.

Also those chassis pics indicate what an R4 chassis rusts like too, the worst rust is usually on the unprotected inside of the chassis members, which shows up as a seeming superficial rust blister......

Have fun with the repairs!
 
DoubleChevron said:
Hi Chris,

bootlid could be a good starting point. Maybe SWMBO is a bit of an artist and can paint something artistic on it for you :)

Shane, in my best Leunig impersonation - "I'm just an inocent bystander" I think you were addressing Gerry :rolleyes:

...but yes, Mrs GB is very handy with a sable :clown:

Did I not read somewhere on AF that phenol is the go for restoring alloy to as new condition??

Cheers
Chris
 
DoubleChevron said:
Hi Chris,

if you have a look at the painting thread in the technical section, Neils (username CGAT something-er-other) has mentioned to me before how to clean alloy.

Basically to get it nice 'n' shiny you need to sand it flat with wet 'n' dry paper, then polish it with alloy/metal polish. I wire brushed a lot of the alloy on mine, this dramatically improved it from it's 'corroded' look.

bootlid could be a good starting point. Maybe SWMBO is a bit of an artist and can paint something artistic on it for you :)

seeya,
Shane L.

I don't think Chris asked a question :D

Kinda hoping for an easier option than sanding & polishing the alloy. All those fins put me off.

Overseas artists have a field day at the expense of a duck panel.
Although not paint related, this 2CV is rather artistic:
 

Attachments

  • 2CV19.jpg
    2CV19.jpg
    77.9 KB · Views: 517
Today I decided to clean up the body to get a definite idea of the extent of the rust problem. Doesn't look like it but it took all day & part of the evening to get it where it is now.

Nearly all the black bituman has been removed, along with most of the yellow paint on the firewall. It is easy to tell what areas need addressing so the car can be rust free after all this!

I was hoping I'd find the Orga number with the newer paint removed so I knew exactly how old the car is. Not there. I'm still fairly sure it's an 86 model.

To remove all the gunk I used a paint stripping heat gun & a paint scraper (& a lot of patience & mess). I'll still need to finish it off with sandpaper or the flappy attachment to the angle grinder once the welding is done. All rust damaged areas are now in plain view so it's easier to work out how to tackle it.

Removed the windscreen (which I broke :doh:) to reveal more of a rust problem than I would have ever imagined!
Pics attached. It doesn't concern me as the bonnet repair panel also replaces half way up the windscreen as well. It is just amazing what was going on behind the scenes here. The car presented quite well.
Hope I'm not scaring 2CV owners with all this.

The chassis has really collapsed now under it's own weight just sitting there, & looking at the body, I wonder just how much metal was keeping the car in one bit.

I removed a repair panel the last panel beater/ welder put in to reveal a large hole in the middle of the firewall. I'd prefer to cut out all problem metal properly & have new metal welded in it's place.
 

Attachments

  • chassis36.jpg
    chassis36.jpg
    74.7 KB · Views: 536
  • chassis37.jpg
    chassis37.jpg
    52.9 KB · Views: 538
  • chassis38.jpg
    chassis38.jpg
    49.3 KB · Views: 552
  • chassis39.jpg
    chassis39.jpg
    58.6 KB · Views: 553
  • chassis40.jpg
    chassis40.jpg
    40.8 KB · Views: 551
  • chassis41.jpg
    chassis41.jpg
    54.9 KB · Views: 526
Top