
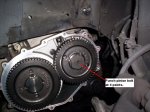
The ZF 4HP18 was used in a few cars, notably SAAB 9000, Alfa 164, some Pugs/Citroens using the 12 Valve V6 and some diesels. In this case, it's a 12 Valve V6 XM II built in 1994.
The problem started with what seemed like an intermittent gutless misfire moving off from lights. I initially thought it might have been a fuel or engine issue. Then it began moving off in 2nd or randomly changing up and down or just up too early. It was initially OK if driven manually and only behaved strangely in Drive. I used it a few times controlling the gears manually, but it eventually refused to select 1st, would shudder badly in drive when pulling up and reverse would only engage after rowing the stick back and forward a few times. I looked to see if the 'New Car' light was now on. $$$$ flashed before my eyes!
SAAB 9000 and Alfa 164 owners have been here before and common problems with the 4HP18 in those models are generally blamed on the governor seals and/or accumulator springs in the valve block. In this case (XM) it was a broken governor seal at fault and the problem was cured by replacing two rubber seals in the governor. Replacement doesn't need any special tools, but you will need a 36mm socket and a decent breaker bar, which may not be present in the average DIY tool kit.
ZF Australia (02 9679 5555) were helpful and able to supply the parts, but didn't have the end cover gasket, so I salvaged mine, adding a smear of sealant. The gearbox ID info is on a small plate on top of the casing below the throttle body and is worth being able to quote. Some of these have PSA part numbers, but most are now marked as NFP, so going to ZF is probably the best way now. Parts list, but check the bolt especially by giving the gearbox number:
0734 313 088 01 - Filter cover o-ring
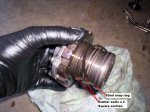
0750 113 025 01 - Ring, Rectangular (steel snap ring)
0501 306 310 01 - Ring, Seal (Square section rubber. 2 required.)
1036 309 269 01 - Screw (36mm, about 1 inch long for pinion. $39+ from ZF. Check this!)
0750 112 168 01 - End cover gasket (Citroen still list this. $32+ from ZF)
For the valve block accumulator springs (A and D), the part numbers for the XM V6 are:
0732 042 472 01
0732 042 380 01
These are different numbers to those I've read given for the SAAB, so quote the gearbox info if chasing these.
A good place to begin for the governor seal job is here:
http://www.saabcentral.com/forums/showthread.php?t=200366
Post #8 has good instructions.
I'd add to this:
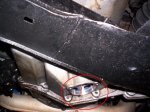
* For the XM, you remove the splashshield under the left wheel arch by removing 4 push clips and one 10mm plastic nut at the bottom.
* Remove the 10mm bolt retaining the ABS/Brake pad wiring support and push it aside for access.
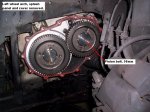
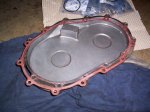
* All the cover Torx (T27) setscrews were the same length on my gearbox.
* Put the handbrake on and the gearbox in P to remove the pinion bolt (Also to torque it later). It's quite tight, so use a good breaker bar. If you don't have a 36mm socket suitable for a shallow headed bolt and a good breaker bar, don't attempt the job as you will struggle to undo it and not be able to correctly torque the bolt later.
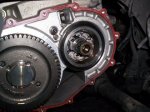
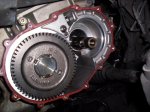
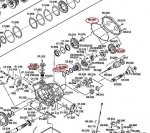
* The pinion gear just slides out with the bearing race attached, but note the flat washer that will probably stick to it. It slips over the splined shaft and the shiny areas show you how it fits.
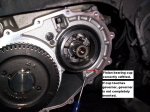
* Note the clearance between the governor and the bearing cup and the way the cup sits in the housing, so you can refit it correctly. The angular position of the gear and governor are not important, so you do not need to mark anything.
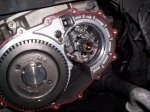
* If the gearbox is warm (run the engine a few minutes beforehand) the bearing cup may come out fairly easily, but it is a tight fit. Otherwise, heat the case with a hot air gun.
* The pinion shaft will feel loose and drop off centre with the governor out. That's OK.
* The middle rubber ring seal was broken in my gearbox, but still felt quite soft. That was the problem.
* Refitting is easy enough with care. I initially failed to push the governor home as one rubber ring hadn't entered the case properly. This meant the bearing cup would not seat properly as it was touching the governor. The steel ring and first rubber seal do slide in OK, but the second rubber seal has to slip in after the splines on the inside have started to engage. Having it in Neutral and gently turning the governor and the shaft will help to get this second rubber seal to slip in.
* Turning the gearbox over via the left hub (fit 2 wheel bolts) made access easier for punching the bolt's edges.
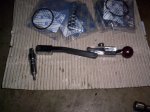
* Preferably use a small torque wrench to torque the cover bolts as the torque is just 7.3 ft.lb., which is below what the typical torque wrench is designed for. I bought mine years ago to adjust a brake band on a BW Model 8 gearbox.
I decided to leave the valve block springs for some other day, but the governor seals have fixed the fault and it now operates correctly.
The problem started with what seemed like an intermittent gutless misfire moving off from lights. I initially thought it might have been a fuel or engine issue. Then it began moving off in 2nd or randomly changing up and down or just up too early. It was initially OK if driven manually and only behaved strangely in Drive. I used it a few times controlling the gears manually, but it eventually refused to select 1st, would shudder badly in drive when pulling up and reverse would only engage after rowing the stick back and forward a few times. I looked to see if the 'New Car' light was now on. $$$$ flashed before my eyes!
SAAB 9000 and Alfa 164 owners have been here before and common problems with the 4HP18 in those models are generally blamed on the governor seals and/or accumulator springs in the valve block. In this case (XM) it was a broken governor seal at fault and the problem was cured by replacing two rubber seals in the governor. Replacement doesn't need any special tools, but you will need a 36mm socket and a decent breaker bar, which may not be present in the average DIY tool kit.
ZF Australia (02 9679 5555) were helpful and able to supply the parts, but didn't have the end cover gasket, so I salvaged mine, adding a smear of sealant. The gearbox ID info is on a small plate on top of the casing below the throttle body and is worth being able to quote. Some of these have PSA part numbers, but most are now marked as NFP, so going to ZF is probably the best way now. Parts list, but check the bolt especially by giving the gearbox number:
0734 313 088 01 - Filter cover o-ring
0750 113 025 01 - Ring, Rectangular (steel snap ring)
0501 306 310 01 - Ring, Seal (Square section rubber. 2 required.)
1036 309 269 01 - Screw (36mm, about 1 inch long for pinion. $39+ from ZF. Check this!)
0750 112 168 01 - End cover gasket (Citroen still list this. $32+ from ZF)
For the valve block accumulator springs (A and D), the part numbers for the XM V6 are:
0732 042 472 01
0732 042 380 01
These are different numbers to those I've read given for the SAAB, so quote the gearbox info if chasing these.
A good place to begin for the governor seal job is here:
http://www.saabcentral.com/forums/showthread.php?t=200366
Post #8 has good instructions.
I'd add to this:
* For the XM, you remove the splashshield under the left wheel arch by removing 4 push clips and one 10mm plastic nut at the bottom.
* Remove the 10mm bolt retaining the ABS/Brake pad wiring support and push it aside for access.
* All the cover Torx (T27) setscrews were the same length on my gearbox.
* Put the handbrake on and the gearbox in P to remove the pinion bolt (Also to torque it later). It's quite tight, so use a good breaker bar. If you don't have a 36mm socket suitable for a shallow headed bolt and a good breaker bar, don't attempt the job as you will struggle to undo it and not be able to correctly torque the bolt later.
* The pinion gear just slides out with the bearing race attached, but note the flat washer that will probably stick to it. It slips over the splined shaft and the shiny areas show you how it fits.
* Note the clearance between the governor and the bearing cup and the way the cup sits in the housing, so you can refit it correctly. The angular position of the gear and governor are not important, so you do not need to mark anything.
* If the gearbox is warm (run the engine a few minutes beforehand) the bearing cup may come out fairly easily, but it is a tight fit. Otherwise, heat the case with a hot air gun.
* The pinion shaft will feel loose and drop off centre with the governor out. That's OK.
* The middle rubber ring seal was broken in my gearbox, but still felt quite soft. That was the problem.
* Refitting is easy enough with care. I initially failed to push the governor home as one rubber ring hadn't entered the case properly. This meant the bearing cup would not seat properly as it was touching the governor. The steel ring and first rubber seal do slide in OK, but the second rubber seal has to slip in after the splines on the inside have started to engage. Having it in Neutral and gently turning the governor and the shaft will help to get this second rubber seal to slip in.
* Turning the gearbox over via the left hub (fit 2 wheel bolts) made access easier for punching the bolt's edges.
* Preferably use a small torque wrench to torque the cover bolts as the torque is just 7.3 ft.lb., which is below what the typical torque wrench is designed for. I bought mine years ago to adjust a brake band on a BW Model 8 gearbox.
I decided to leave the valve block springs for some other day, but the governor seals have fixed the fault and it now operates correctly.
Attachments
-
 4HP18_01_FilterCover_sml.JPG97 KB · Views: 1,032
 -
 4HP18_02_EndCoverOff_sml.JPG98 KB · Views: 858
 -
 4HP18_03_PinionOff_sml.JPG87.5 KB · Views: 1,174
 -
 4HP18_04_BearingCupOff_sml.JPG93.9 KB · Views: 1,257
 -
 4HP18_05_GovernorOff_sml.JPG95.3 KB · Views: 932
 -
 4HP18_06_Broken Seal_sml.JPG85.5 KB · Views: 1,568
 -
 4HP18_07_GovernorRefitted_sml.JPG82.2 KB · Views: 893
 -
 4HP18_08_PinionCupRefitted_sml.JPG93.2 KB · Views: 865
 -
 4HP18_09_PinionBoltRefitted_sml.JPG91.4 KB · Views: 924
 -
 4HP18_10_CoverGasket_SML.JPG89.6 KB · Views: 768
 -
 4HP18_11_SmallTorqueWrench_sml.JPG83.7 KB · Views: 1,087
Last edited:
 (Or a farmer...)