Removing Xantia strut tops

agd123

Member
Fellow Frogger
Joined
Dec 14, 2010
Messages
214
Location
canberra
I have replacement rubber strut tops for my Xantia, replacing before I wreck another bonnet!

However, I have successfully loosened the 4 mounting bolts, the top nut holding the strut in place, hydraulic connections etc. BUT I have not been able to loosen the central bolt so that the strut can be lowered to get the strut mount out. Tried a hexagon socket in the end of the bolt, even broke a socket trying to loosen it, have put penetrating oil into the gap, all to no avail. Is there some trick which I am missing? HELP!

Regards

agd123
 
Have you got a rattle gun? That's the first tool of choice.

Next scab off the rank is an impact driver. If you don't have one, buy a Koken "Attack Driver" from UKTools, with the 16-piece bit set in the box. It'll cost about $100 but pay for itself when you replace the hydraulic pump seals like a pro.

FWIW I'd crack the nut with suspension pumped up to maximum height.
 
agd123 if I read you correctly, you have the nut at the top of the strut off, but you are trying to remove the large bolt at the bottom ?
If so, I say you don't need to do this, just undo the top anti roll bar link from the strut & jack up the car. With a little persuasion the strut will drop down with sufficient clearance & jiggling to R & R the strut top.
This is the way I have done mine. If you need to persuade the strut to drop out of the top mount, be sure to leave the nut on, but loosened to protect the thread.
Incidentally, series 1 gaiters are no longer available, if like mine they are stuffed, but I am advised that ser.2 units will fit & I have just ordered them through Accessories Citroen Lorient , France [ thanks Addo ].
Have fun,
Richard
 
No, I have the nut off the top no problem, the problem is to get the threaded stem downwards out of the strut mount so I can replace the mount.

Regards

Agd123
 
Oh! It's just stuck in the old O-rings. Copper faced mallet.
 
There's a slight taper on the strut I'm sure. You could fit it back into the tower and let the weight of the suspension/wheel help you break it, but support it enough so it doesn't fall in an uncontrolled way.
 
David is right,it is tapered. Leave the nut on to protect the thread, use a brass drift & large heavy hammer, & place something under the hub to stop it falling too far when it lets go.

So much fun, all for free !

Richard
 
Problem solved, should have spotted it ages ago. For anyone else with the same problem, there are 2 threaded holes in the top of the strut mount 6mm, you can put a long set screw in each. Get a strong plate & drill 2 clearance holes to suit the strut top hole centres, about 55mm in my case, place it on top of the slackened but not removed central retaining bolt, insert the set screws with nuts on them and tighten in the holes. Then evenly turn down the nuts to put pressure on the central bolt, came off easily!

Hope this goes into archives, no idea how that works.

Thanks to those who tried to help.

agd123
 
I'm having a shit time trying to get the piston back into the Lithuanian refurbished mount, any suggestions on how to do it easily : ) !!
thought it would take no time but ran out of energy struggling with it.
Cheers Steven
 
Have you secured the mount to the body and now trying to fit it??? They flex a great deal as you turn the wheels either way, so the 'angle of the dangle' makes a big difference when assembling. Turn the wheels straight ahead and fit the mount (hand tight) to the taper before securing it to the body. Then tighten everything. If that doesn't work, then there must be something stuck inside the mount or it's a different internal size to the one you sent??? Apart from the different Hydractive vs non-Hydractive port sizes, there are a few sizes of XM mounts but I can't recall if the Xantia is similarly afflicted.

The manual for the XM suggests using a 'spray' to break the taper. That would mean a temperature reduction spray on the piston I guess. Maybe hot air on the mount. The two bolts and plate idea is also a sensible solution, but, like usual ball joint splitters, it probably wants a bit of a smack to make it let go once loaded up rather than expecting the tool to do the whole job.
 
There are 3 ( 4 actually) different sizes David, the supplier ( Irmantas in Lithuania checked all my specs, yes I made sure I had the right ones before he sent, we went over it about 4 times I think! Anyway having the mount loose sounds like a plan as that will give leeway for alignment, i was thinking of disconnecting the stabilizer bar from torsion bar to allow the whole supension unit to be more movable but just having the mount loose could do the trick, hopefully! I got the instructions to do it this way off xmclub site, guy had a xantia with cactus mounts, completely severed, I checked the first one I'm doing and there are early signs of it tearing so good I have started to solve it.
Separating was easy using a splitter with two 6mm screws in top of mount to push the piston off taper. Fingers crossed!
Cheers Steven


ps so put the mount over piston and push piston up before fitting mount? Theres not much room to move under wheel arch and I'm worried if the hub hangs to low the diff might jump out of the gearbox.
 
Last edited:
I remember having some frustrating moments getting the strut rods back up the new mounts enough to get a nut onto. You pull them out to full length then lift up the bottom of the strut, they catch and push back down - and its hard to hold a LHM slippery strut rod up as you lift. But I did get there in the end without needing an assistant if I recall. So keep poking.

Cheers, Ken
 
Maybe, do one at a time and support the knuckle with a jack under the balljoint. The rollbar on the other side will limit the movement if you are worried about it. You can either jack the knuckle up to start the nut or it should be possible to fit the mount to the piston under the guard and then jack the whole assembly up to the body. Don't pinch your new o-rings or forget to slip the boot over the cylinder as the first step!
 
Well I've just spent most of the day trying to sort the mounts out, only did one! Well sort of. I tried and tried to get the piston up into the mount but no chance. So I thought take the whole piston unit out and put it back in as one with the mount attached. That was pretty easy to do once out of the car. I got to doing up the feed pipe and thought hmm lets compare the inside of the mount feed on the rebuilt ones with the old ones. So check the left new one with the right old one They didn't match. The threads were the same, same pipe size allowance but the old one has a tapered end and the replacement nothing. So after reinstalling the mount and doing everything up I get to this stage. Usual Citroen water of a ducks back "what's new?" sensation equivalent to dismayed ambivalence.
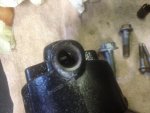
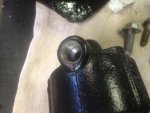
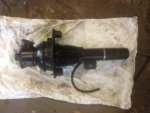
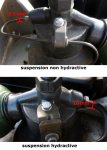
I figured the best way to attach a mount to a piston is to take the whole suspension unit off and then refit it. You just need to be patient when getting the cylinder out of the hub carrier, mine took some gentle persuasion with a mallet and piece of rod tapping away. So what to do now? Put the old one back in the interim until I can figure out best approach to solving having the wrong connection between inlet pipe and housing. God this is annoying : ) the first two shots show new mount feed pipe internal compared to original removed mount (which corresponds with the following photos from Elasomer.co (third photo shows unit ready to go back on) and the last two photos show options on pipe feeds sent to me to choose from but the ones sent to me were completely different again. argh! I reckon it's off an XM. Least I got some exercise on the pushy down to the shed so I could slave away in our infernal heat!

photos- image 2.jpgimage 3.jpgimage.jpgXantia different oil pipe nut sizes.jpgxantia hydractive and non-hydractive.jpg
 
Last edited:
The XM mount has a different top casting and the pipe port and sphere mount share almost the same axis and are angled the same way. With the Xantia, they are pitched against each other, if that makes sense. XM and Xantia mounts are quite different. Pics 1 & 2 appear to show the same top casting, so I doubt you've been sent an XM part.

Maybe, someone bored out the hole to take an adapter so it would fit a different model??? The Hydractive pipes I've encountered have sealed on a conical face, but very late Xantia LHM regulators changed from a regular pipe seal to a bonded rubber/steel seal as used in C5 suspension piping. I don't know if that was adopted in the suspension for very late Xantia also. If so, it would be more likely to turn up in Europe than down here.
 
ah I noticed the casting on the feed pipe was much chunkier on the refurbished ones compared to the ones on mine. Whatever the case I am in possession of two mounts that are useless to me unless I send back or look at a different pipe set up, which I don't want to do because I thought I was getting parts that were correct. So he's sent me the wrong part after I confirmed from photos he sent that those were what I was after. Drama drama. Going to whack the old one back on tomorrow so at least I can drive around ( and wonder if the mount is going to go through the bonnet!) Ah she'll be right.
 
ok update , took the whole suspension unit out again and low and behold the inlet on the 'new' mount is correct for the feed pipe. So my other suspicion that I simply had not done up the nut correctly was correct. Put it all back on again. It only took about three goes to get the swine inlet nut to seal properly, big help to have the actual mount loose so the pipe has room to wriggle around before tightening up, luckily I had access to a 17mm flare spanner to get it to sit properly on last attempt. Bit of up and down bleeding to sort the air in system out ( using a welding glove to stop burning the paw on hoses as I wrangled the regulator bleed screw open and closed and bingo final result one side now bonnet rupturing incident free. So the left hand side yet to be done, the issue now is why does that side have a different inlet profile? I got stuck with comparing the old right hand side with the new left hand hand side mount. tbc! One side was enough for amateur antics today : ) its amusing to think a mechanic does this stuff all day but have no complusion to document their efforts as if they had just solved the greatest mysteries of repairs! ha ha.
 
Last edited:
Top