Lets install a fuel tank

Bowie

Well-known member
VIP Paid Subscriber
1000+ Posts
Fellow Frogger
Joined
Aug 19, 2002
Messages
5,259
Location
Melbourne
So how good is Christmas. With not having to be back at work till the 10th of Feb, best start working out this fuel tank.

Oh background time.
I've taken the ol' tank, lines and mechanic pump out of my reno 12, and have a ~30L Aluminum tank ready to go in. Why so small? Well my 1298cc is not going to be making dumb amounts of power, back of the envelope says ~100hp needs about 30L of fuel every hour. that will be more then enough for track days, and any sprint / regularity / even endurance event I'd ever want to run given the mandatory pit stops.

So why?
Well it was just a bunch of unknowns and waning to tidy up the fuel lines, and just not having to worry about crap lines, dirty tanks etc etc. Inspecting the original tank I noticed most of the mounting tabs had actually broken off the chassis anyway, and, I could never fill it up at SMSP as it would piss out the fuel cap (where it's vented) when ever I turned left. So, right. lets just piss it off.

Rules.
Should it ever get a log book, it's gonna end up a 3D sports sedan. In Vic there is a pretty active Under 2L Sports Sedan group that is seemingly dominated by modern mini's. They share grids with the Pulsars so there is enough of them to run every now and then, looks like something to aim for.
Motorsports Aus let you make a tank, just needs to be at least 3mm aluminium or stainless, mounted away from the cabin / secured in a box, vented with roll over protection (which the original tank didn't have), they have limits on how much fuel you are allowed to have (80L max for a 1300cc) and it needs to be secured by a cradle / and or straps.
The Sports Sedan rules have one further stipulation, any part of the fuel system must be at least 500mm away from the rear, or else you need to protect it with honeycomb aluminium, or Nomex.

What to do.
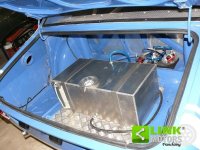
Well I reckon something like this, positioned on top of the rear having it more toward the middle, anyway actually leaves me ~560mm away from the rear, and provides a sane mounting position for elec pump and filter to go behind and below before swinging back to the cabin.

IMG_0143.jpg
IMG_0196.jpg
IMG_0197.jpg
IMG_0395.jpg
IMG_0396.jpg
IMG_0397.jpg


Re the cradle, I’m tempted to weld it at the back and sides to the beam. This might be enough to not have to support it from the back, I’ll have a think about that… otherwise some triangles bringing it down to the floor, big washers either side and it should be bomb proof compared to the original..

In regards to a strap, probably just add some tabs to the sides and run it over the top in front of the filler neck. I’ve left room in the cradle to insert some padding also, didn’t like the idea of the steel rubbing on the aluminium.

Ok, now just to clean it up a bit and force together with the heat of a small portable sun.

Wish me luck.
 
Last edited:
I was thinking of doing a similar thing in my 205, primarily to get more weight over the left rear wheel, but also having a fuel cell with a bladder is a lot safer.
 
I was thinking of doing a similar thing in my 205, primarily to get more weight over the left rear wheel, but also having a fuel cell with a bladder is a lot safer.
Are there chafing issues with bladders over time?
 
Bladders usually die of old age before they chafe. They have a use by date under the FIA safety standards There is no room for them to move in their tub so chafing is not a problem

They will melt if you put F1 rocket fuel in them. Back in the 1980's, before putting it in Jim Richards car, Frank Gardner asked me to test some F1 turbo fuel he acquired from Brabham or Williams. It melted the bladder into a big black puddle under the GT car was about to drive. Worth a try though.

The bladder was held in a big square Kevlar tub under the rear, very low ground clearance with a contour in the tub shape to give it some aero effect. The car was one of a few built by McLaren for BMW to use in under 2 Litre GT class. Some later ran with Turbo F1 style BMW engine.

Bowie, foam used in the foam filled tanks also has a use by date and starts to break down, block filters etc after a few years, again depending on fuel and type of foam. Some people don't actually run foam in tanks which are supposed to be foam filled.
 

Attachments

  • TRIEEA.jpg
    TRIEEA.jpg
    59.8 KB · Views: 123
  • TRIE6AF.jpg
    TRIE6AF.jpg
    61.1 KB · Views: 129
Is that your younger brother leaning against that BMW? :p
 
It's also a lot easier in a sedan as the boot is effectively a box. A 205 is significantly more challenging, as there needs to be a barrier behind the driver. No different to a Mini etc., I know, but it takes a significant commitment to cut the floor pan open. Fuel filler could go through the side window.
 
Is that your younger brother leaning against that BMW? :p
That's chief mechanic Billy McClay in each shot. I'm in the car helmet on. The young guy standing beside the Monza about to put his helmet on is Brad Jones (BJR Racing) when he had hair.
 
Yes not wrong Peter. My first thought was to simply put in a false floor, use the original mounting points for the floor, attach tank on top, done. I just didn't want to faff around with honeycomb or nomex and the perceived benefit of moving the weight ontop of the beam housing gave me a project
 

Attachments

  • vehicle_ad_standard_image_73386910e5ab925e0fff4a45f6d1aa48.jpg
    vehicle_ad_standard_image_73386910e5ab925e0fff4a45f6d1aa48.jpg
    169.5 KB · Views: 120
Ah lick-a-di-slip! this should do the trick!

IMG_0411.jpg


IMG_0416.jpg


The "bracket" is all 3mm right angle section, which was pretty forgiving with the new welder. I'm letting it all cool down to see what actually stuck, but it sounded like bacon in some spots when welding, looks like it worked, the flappy disk will be the truth teller!

I made it a little difficult for myself by cutting sections out of the bottom cross brace to accommodate the little legs, this gave me the opportunity to weld from every possible direction which, well it's half the fun in learning.

I've designed the cross brace to clear the beam should I wish. I can weld / directly on it from this location, but I think I may just continue to apply 2 x M8 bolts with large 30mm dia washers underneath the sheet metal to secure it. So we will end up with x6 M8 bolts on the top beam section, and 4 x M8 bolts either side, down below.

So far so good!

Welders are neat!
 
  • Like
Reactions: COL
#edit. sorry its a little confusing, there will be x2 m8 bolts either side on the lower cross beam. So the structure will be held in place by x10 M8 bolts and hardware, replacing the x6 M6 bolts the original was attached with..
 
Is weight a consideration?
that all looks heavy
 
weight is a thing, I suppose from here I can start removing sections if necessary.

But It's not to bad... I'll bust out the scales later and compare to the OG tank. Gut tells me I haven't added weight, but we'll see.
 
I have absolutely no idea how to weld, but everybody sez you need to clean up the metal very well before welding it. Your sizzling sounds like the weld was trying to get through mill scale. Adjustments to current, etc., are critical too, I hear.
 
Well I know have a little more of an idea toward what's involved in forcing angry pixies to mate with each other to fuse crap together. Check out this aftermarket factory original OEM fuel tank holder :p

IMG_0429.jpg


IMG_0424.jpg


IMG_0426.jpg


Some keen observers will notice I've removed the parcel "shield" where the rear seat was, along with the angle supports holding the parcel shelf. Turns out I miss measured by a good 20mm, and there was no way the tank was going to drop in with those support structures in place.

DOH.

It's ok, I have to go back and plate that opening anyway (old one was made of poly-carbonate) I'll get ~1.5mm steel panel and bolt it in, this giving the "structural" support back along with complying with keeping the tank sealed away from the cabin. Once the cage is in I can go back to sealing that hole with lighter material.

You can see also the structure has provisions for the straps to go over the tank, everything is nicely tied together with M8's and the straps are currently 20mm x 3mm thick aluminum. Rules give no direction over then "strap" but I figure with will be plenty for the 30kg of fuel, and seems in line with what I have seen others do..

Ok, from here I just need to fine some rubber material to lace the frame / covering the bolt heads to protect the bottom of the tank, and similarly with the straps, and then on to plumbing the 8mm EFI hose under the car.

I'm going to follow more of less the chassis leg to the front, I can pretty much go straight from here. The OE line juggled around the handbrake a bit, I won't have that problem. Oh, I picked this side because the exhaust is going to exit behind the driver. Figured since I can keep the heat away from the fuel why not.

Once it's in the engine bay It will meet the pressure reg attached to the firewall and then onto the carb(s). Oh, fuel filter! no worries. I have a nice little inline jobie that sits from the outlet in front of the pump. The filter and pump will pretty much be directly connected, all good.
 
Nice job, bowie.

You know you can cut a Carbon fiber panel and Sikaflex it into place in place of that rear firewall, right? May cost more than the car, but you've got options. That would make for a very rigid structure.

You can buy self adhesive foam strip from places (maybe even Bunno's) for the support and straps. Also from Bunno's you can buy these thingos to clamp the straps:

https://media.prod.bunnings.com.au/...48f47cd9368e307f6e2c6b0?v=29470290&t=w500dpr1

They adjust over some good range so no need to be spot on with the strap length and they have a tongue that is coming right at you in that picture so you can't see it very well, inbetween the red sections of the latch where you can put a padlock or some such to make sure it doesn't open by itself. Makes it quick to take the tank out too.
 
Ah nice idea with those clamps. I don't really need to apply tension but that gives the leave way for shitty drilling / measuring. I've left a bit of slack in the strap angles I've bent, so I figure I'll under measure, make it shorter a smidge then with the

And yeah those foam strips are what I'm after, just something to soften the bolt heads and peace of mind.

Incidentally I use those very clamps in an application for a client at work. They needed a quick release setting to connect a ISO100 quartz tube to a vacuum furnace and Bunnings was to the rescue with those adjustable clamps. There was enough movement in the clamp to adjust on the thread as they needed.

Noice.
 
Last edited:
Well just started running the main fuel line and well, really neglected how good the original placement was.

I thought I knew better you see, but in effort to make it as direct as possible, I will have to enclose a section of it as it now extends into the cabin for, I don't know, 16 inches. I have endeavoured to avoid any right angle curves and to do as much without getting in the way of the moving bits, well it has made it difficult :ROFLMAO:

I'm going to go from the tank, over the rear beam housing, into the backseat, then via the floor back to the underside and carry on along the passenger side beam before popping up in the engine bay, running across to where the battery was, then into the carb(s).

Certainly will be direct, my overpowered pump will be having a great time working nice and easy. So no real drama just making work for myself having to enclose a section of it.

VIV LA RENO!
 
why did you locate the securing bolt within the frame where the tank sits??
Does the tank end up sitting on just this bolt or is that an illusion??
Jo
 
ah yes, this is a short coming in what I've ended up with. The tank "does" sit within the frame on actually x6 bolt heads. What I've done however is gone back with thick 5mm foam, and installed that within the rail, protecting the bottom of the tank from vibrations, and the bolt heads rubbing the aluminium.

The folded straps that go overhead are just securing the tank within the frame, not pushing down if that makes sense. I've used the thick foam to snug out the contraption to keep everything "still" as much as possible.

I'm going to keep an eye on wear marks as it gets used however.
 
Top