DS Valeo starter/engine mounts

mnm

Croak croak...
1000+ Posts
Fellow Frogger
Joined
Dec 13, 2010
Messages
3,236
Location
Sydney
Greeetings all

well I'm back at Mum's place and have taken over the garage yet again.:tongue: This time it's to replace my dying starter motor and while I'm at it the engine mounts. Funnily enough when Craig posted his thread on replacing his starter motor a while back mine started sounding very sick.. to this point in time where I have to give it a tap tap tap :mallet:to get it to work.

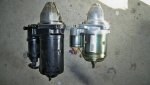
Anyway, I sourced a new Valeo fron Darrin in the UK and Richo very kindly rebuilt a couple of engine mounts for me.:worship:. as I feared they're so shiny they're too good to use.. they make the engine bay look like a pig sty!

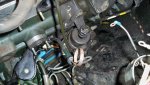
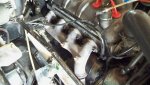
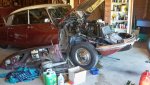
I dived into it this afternoon and have taken a few pics for others reference as my D Special has the 4 into 1 exhaust manifold.. so not quite as involved as a double manifold.

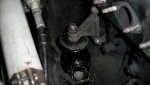
Only 2 of the manifold studs came out with the nuts, the rest were very easy... likewise the clamp for the single down pipe. Once they were out of the way access was much improved. I now know what you were talking about Craig with the lower bolt on the starter motor...AGGGHHHH!!!:mad: I managed with my 1/4 drive and flexible elbow.. somehow..once it cracked they all undid easily.

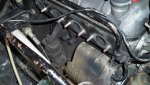
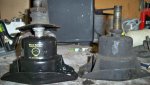
I ended up removing the engine mount with the bracket attached.. you can see the height discrepency when compared with the new one.. Managed to get it back in before I ran out of light.. lovely weather up here so will carry on tomorrow.

Matthew:)
 

Attachments

  • 100_0588.jpg
    100_0588.jpg
    101.9 KB · Views: 963
  • 100_0589.jpg
    100_0589.jpg
    103.9 KB · Views: 2,602
  • 100_0590.jpg
    100_0590.jpg
    100 KB · Views: 1,024
  • 100_0593.jpg
    100_0593.jpg
    98.5 KB · Views: 1,109
  • 100_0594.jpg
    100_0594.jpg
    90.9 KB · Views: 889
Good stuff, now some comments/questions.

Did you get new manifold gaskets? Well worthwhile, and use some gasket sealant with them too.

Are you replacing the main power lead to the alternator? May as well while you're looking at it.

I think you saw the photos showing where to move the rear bracket to on the heat shield. It takes five minutes. Leave it full length.
 
Re the heat shield bracket. Another option is to make up a rod tapped internally to M5x0.8 at both ends and cut to just under 50mm. It screws on to extend the post to the existing bracket. A lathe helps, but you could make it with just a drill and a tap. Moving the bracket along the shield is possibly easier for many people though.
 
Hi David, Would this be what you are describing David?

2v10l0j.jpg


Actually the thread is 5 x .8 at one end and 7 x 1 at the other, length being 52mm.
 
Something like that, yes. The post on the starter I have was M5x0.8, so I used the same size at the other end. The drink is an essential component of the job!
 
Good stuff, now some comments/questions.

Did you get new manifold gaskets? Well worthwhile, and use some gasket sealant with them too.

Are you replacing the main power lead to the alternator? May as well while you're looking at it.

I think you saw the photos showing where to move the rear bracket to on the heat shield. It takes five minutes. Leave it full length.


Hi Craig,

yes.. basically.:) Darrin supplied new gaskets, studs, nuts and washers for the whole job.. in case I needed them... and the clamp for the downpipe.

Richo is supplying the bracket for the heat shield..mmwaa ha ha ha ha!:wink2:

Thanks for the heads up.

Matthew
 
Are you replacing the main power lead to the alternator? May as well while you're looking at it.

You mean the starter, yes?

Cheers
Chris
 
All I'm going to say is... ugh!!:( (see picture)


Matthew
 

Attachments

  • 100_0601.jpg
    100_0601.jpg
    104.4 KB · Views: 711
Sooner than later Michael!!:wink2: Bit of a marathon today. Was expecting an easy ride with the left engine mount but to no avail.. Bolts wouldn't budge..access not as good as I was expecting..pipes going everywhere..aahhhh!!:mad::mad::mad:

Solution! Remove fuel pump, remove inlet manifold, flood garage floor with coolant..woops! :rolleyes: Well.. I was going to flush the system anyway!

Result.. full access to stubborn Helen Hunt of an engine mount... remove, replace, refit, tighten, collapse!:crazy:

I've checked the starter with power.. As the great Science Officer Spock would say:

"Full power has been restored Captain!" :party: 
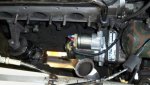
Woo hoo!! Just need to fit Richo's bracket for the starter heat shield and I'll be good to go go go!!

More coming.. stay tuned.

Matthew
 

Attachments

  • 100_0602.jpg
    100_0602.jpg
    101.5 KB · Views: 999
  • 100_0603.jpg
    100_0603.jpg
    95.7 KB · Views: 8,944
M. mnm,

My old noggin is working overtime here.

You have already done the hard work re engine mounts but I am sure that I never tackled them that way....just all done from above by removal of the upwards facing 14mm bolts on the firewall bracket and the big nut atop the central vertical bolt, then raise the engine enough to slip the mount off ... those bolts onto the block itself are always soooo tight, and bloody awkward to access.
Advice in the dim distant past was to mount the block brackets onto the vertical central bolt in the rubber mount as high as possible, leaving only about one thread at the top .... ( after all the big central bolt is threaded all its length ). It gains another 12 mm of clearance between the mount and the block brackets.

The argument was to allow more sag in the rubber before the block bracket made contact with the outer shell of the mount again.
I am wondering was the old advice faulty ? Has the collective wisdom varied ? Mind it is a close fit under the bonnet when injection gear is fitted atop the engine, but on a carburettor D that clearance under the bonnet isn't a problem.
 
Advice in the dim distant past was to mount the block brackets onto the vertical central bolt in the rubber mount as high as possible, leaving only about one thread at the top .... ( after all the big central bolt is threaded all its length ). It gains another 12 mm of clearance between the mount and the block brackets.

That's is the advice I recieved from DS Motors when I fitted mine - it also was bourne out by a measurment given to me by Richo within maybe a thread. :wink2:

Cheers
Chris
 
M. mnm,

My old noggin is working overtime here.

You have already done the hard work re engine mounts but I am sure that I never tackled them that way....just all done from above by removal of the upwards facing 14mm bolts on the firewall bracket and the big nut atop the central vertical bolt, then raise the engine enough to slip the mount off ... those bolts onto the block itself are always soooo tight, and bloody awkward to access.
Advice in the dim distant past was to mount the block brackets onto the vertical central bolt in the rubber mount as high as possible, leaving only about one thread at the top .... ( after all the big central bolt is threaded all its length ). It gains another 12 mm of clearance between the mount and the block brackets.

The argument was to allow more sag in the rubber before the block bracket made contact with the outer shell of the mount again.
I am wondering was the old advice faulty ? Has the collective wisdom varied ? Mind it is a close fit under the bonnet when injection gear is fitted atop the engine, but on a carburettor D that clearance under the bonnet isn't a problem.

Yes you're correct in the removal technique you mention, however on both my mounts the upper nuts were rock solid, so trying to undo them with limited access was rather difficult.. hence the removal on the inlet manifold so I could get to it from the top with a larger tool. (God..you could go to town with that sentence!)

The lower two nuts on the left mount were very tight.. on both sides however the bolts holding the mount brackets to the engine case were quite easy to undo.. so that's why I chose that approach.

Richo supplied a data sheet with the rebuilt mounts which sets the height of the lower nut at 96mm measured from the top of that nut to the bottom of the mount bracket.. +-2mm.

What I did notice was I had to jack the engine up quite a bit to refit the new mounts and get the holes to line up. Once fitted and I let the hydraulic jack down the engine stayed at that height... so obviously the old mounts had sagged quite a lot.

Having said all that.. even if I'm doing more work than neccessary it's familiarising me with all the components of the car/engine and if I need top go back there for another job I can approach it with more confidence.:tongue:

Matthew:)
 
Last edited:
Top